Saturday, May 31, 2014

A More Transparent Me

In October of 2013 I attempted a Breast Cancer Awareness fundraiser with my Thirty-One business. It was a total flop. {Hang in there, this story gets more interesting} I’ve had other successful fundraisers, the most successful and most recent being the Mother’s Day project for the Ronald McDonald House. And it has just recently dawned on me why other fundraisers have been successful and why I received little {more accurately, no} support in my efforts to raise money for breast cancer awareness and research.


I was not open about my personal investment in breast cancer research. I was not transparent about my own experiences. I am not usually open to discussions about my own problems, for the typical reasons: I don’t want your judgements poking around in my life. Even more so, I don’t want anyone who has suffered a more serious diagnosis to feel like I’m comparing my fear to theirs because I know my struggle is minimal in comparison.  I am about to go out of character and share more about myself than I am comfortable with.


In 2008 I found a large painful lump in my right breast and immediately made a same day doctors appointment. After an examination I felt a lot of relief to hear the diagnosis “Fibrocystic Breast Condition” which is very common (in varying forms it appears in about 60% of women). It is not cancerous whatsoever but the masses formed can mimic those that are caused by breast cancer. Breast cancer and fibrocystic breast condition (FCC) both cause breast masses, but from what I understand FCC does NOT increase my chances of developing breast cancer. What it does effect is the ability to detect breast cancer if I were to develop it, especially since now I typically always have a painful mass in one breast or the other. I gladly take these painful lumps over the grotesque battle many other women are fighting.


Again I say, it’s a grotesque battle. Breast cancer awareness is washed in pink, especially so in October. Pink is cute, pink is pretty, pink is easy to look at for most. And I just want to remind you that breast cancer is the opposite. So many companies jump on the “pink wagon” and many product labels turn pink in October to show support. In turn many consumers start reaching for the pink labels to show their support. I’m sorry if I’m being offensive but most of this “pink” is just part of the Marketing Machine. And there lies another of my mistakes. I thought October, being breast cancer awareness month, was perfect timing for a fundraiser but my efforts got lost in a blur of pink marketing methods. Rest assured that when I’m raising funds for a cause, it’s not to entice you to buy a bag so I can turn a profit, it’s to support a mission that I am invested in.


My support for breast cancer is not selfless. Yes, you read that right, I still have selfish motives and I’m about to be transparent once again. I hope to never feel all that a woman feels when she fights breast cancer. I pray to God that I never know that struggle, that weariness, that fear. But if God so wills it I also pray that research has been funded, that innovations have been made, and that my battle would be less than the women who had fought the fight before me.


It’s not October. We’re not surrounded by pink ribbons, pink cans of soup, and football players aren’t on TV wearing pink accessories. You can still donate to Susan G Komen. You don’t have to wait until a designated awareness month to support research and awareness. Susan G Komen does take online donations on their website. Visit: https://secure.info-komen.org/site/Donation2;jsessionid=42074F2E4470C7FE2DB49BD2C71EC3B5.app352b?13842.donation=form1&df_id=13842

Blogger Tricks

Friday, February 1, 2013

Baked Potato Soup {Crock pot}

Happy Food Friday!

This week I want to share one of my recipes for the crock pot . Delicious baked potato soup! It's one of my favorites because you can throw it all in the crock pot and forget about it for 6-10 hours.

Ingredients
About 4 pounds of russet potatoes, washed but not peeled. Diced.
1 medium/large yellow onion, diced
10 cloves of garlic, minced (if you use jarred, it's 5 teaspoons)
32 ounces (1 box) chicken stock or broth
20 ozs (2 cans) of Cheddar Cheese (Campbell's Great for Cooking!)
16 oz cream cheese, softened
1 tablespoon seasoned salt

Preparation
Add onion, garlic, seasoning, cheese, chicken broth, and diced potatoes to the crock pot.
Cook on high for 6 hours or low for 10 hours.
Remove half the soup and add with the cream cheese to a blender, blend until smooth, then re-incorporate.
Stir well.

Honestly the 4 lbs of potatoes is a guess, I've never measured how much the potatoes weighed. You see, I add all the other ingredients first then add the diced potatoes one potato at a time until the crock pot is full. That usually amounts to a few potatoes short of a 5 lb bag. TIP: Use an apple corer to make the dicing go faster!

I usually garnish the soup with a pinch of shredded cheddar cheese, a scoop of sour cream, and some freshly crumbled bacon. MmmMmm good!

Thanks for reading!

Tuesday, January 29, 2013

I Caught Logan... Being Good


It shames me to admit this but my son Logan, well, he's bad. Okay, not entirely bad, but he can be a real terror. We recently {to my complete horror} had a 6 week stretch of tantrum filled days. We're talking every day at least one, but usually more, melt down was triggered at seemingly random intervals for equally random reasons {or no reason at all...}. And these melt downs, oh, these melt downs. We're not talking whining and crying while grunting and reaching for a toy. I'm talking about kicking, screaming, throwing, hitting, headbutting extremely hard objects, so on, and such forth for 45 minutes or more. This whole bit had Logan and I completely exhausted. When it seemed like nothing was ever going to make it stop I doubted myself, I doubted his health, and I feared for our sanity.

I can now proudly say that we have been velociraptor incident free for 3 days. (in this metaphor Logan is the velociraptor and his tantrum is the incident, just FYI) I doubt we're in the clear but I finally feel like maybe, possible, I might have perhaps done some little bitty thing right. (But if you have any temper-tantrum stopping tips I'm still all ears).

From the original post at
wolfelicious.blogspot.com
This post isn't supposed to be all about how to dissect your child's actions to find a root cause and redirect an unwelcome behavior. However, I do want to tell you that it took more than looking at how the temper-tantrums themselves were handled. Now, how you react to your child's bad behavior is important, but I had to go beyond that. I evaluated his schedule, his diet, his other caretakers, and ect. There has been more than one change in our lives to get us pointed back in the right direction.

As we enjoyed out first 'good' day in several weeks I wanted to celebrate his good behavior! He was picking up his toys, listening, clearing his plate, and above all not having any fits {yet}!

I went through my board on Pinterest titled "For Logan" looking to get inspired. I was really just looking for a new fun activity we could enjoy that day but instead I got inspired to create this cute little way to incorporate positive reinforcement in our daily routine.

 Every time we catch Logan being good he gets to put a pom-pom in his jar. I let him put one in for the last two nights at bed time for having tantrum-free days. He shouts "Whoa!" and claps for himself, he knows this little action is a reward. I don't think he cares much that we're going to the Zoo when it's full, he's just tickled that he gets to pick his own pom-pom and put it in his jar.

Our ' Logan got caught... being good jar' is an old Yankee candle jar. I used a trick Jamie shared months ago about saving your old candle jars (see that post here). I printed my label on plain copy paper, mod-podged it on, and decorated it with help from my assisstant, Logan.


If any of our readers have any creative tips for encouraging positive behavior and eliminating bad behavior please, please, please share them here! If you want to talk more about how I evaluated Logan's behavior and the changes we made to help alleviate his tantrums I'm open to sharing my experiences. Just shoot me an email or leave a comment :)

Thanks for reading!


Friday, January 25, 2013

DIY Laundry Detergent Experiment

Do you guys remember this post? DIY Household Cleaners. Here I shared a few of my DIY cleaners including laundry detergent. I have read several times in forums and blogs (I need to start writing down where I read these things!) that you can substitute the Fels Naptha that many homemade laundry detergents use with any bar of soap. I've been waiting patiently to use up my last 5 gallon batch of detergent so that I could test this theory.

Let's recap. Here's my original detergent recipe:

ingredients:
1 Fels-Naptha Bar
1 cup Arm & Hammer Super Washing Soda
1/2 cup Borax
1 sauce pan of water
A 5 gallon bucket with a lid

Preperation:

  • Grate the bar of Fels-Naptha and add it to a sauce pan of water (I use about 4 cups of water). 
  • Bring it to a boil and stir consistently until it is completely dissolved. It will be the consistency of a medium-light syrup. 
  • Fill the bucket about half way with hot tap water, add the Fels-Naptha syrup, Borax, and washing soda to the bucket of water. 
  • Stir until the powders are completely dissolved. 
  • Fill the bucket to the top with more hot tap water, stir, cover, and let it sit over night. It will turn into a gel.
{See the post DIY Household Cleaners for more tips and instructions on how to make laundry detergent}


I've been making my laundry detergent for 27 months and I just whipped up my third batch. Batch #1 was met with a big complaint from Joe, "This stuff doesn't smell good like Gain does". I countered with arguments like the new baby will need a scent free detergent, this recipe will only cost $4 a year, and {my favorite} you smell bad either way :). {I love you!! Just kidding!!}. Batch #2 was created with added essential oils, which did make it smell great. I used Tea Tree, Lemon, and Xlang xlang (Tee Tree and Lemon help with disinfecting!). However, pure essential oils can be pricey and using enough to scent 5 gallons of detergent reduced the cost effectiveness of the DIY method, which is my whole reason for doing it to begin with

Reading about the possibility of using any bar soap for my detergent gave me hope! My detergent would smell great for Joe and still be cheap as dirt. Whoa! Mind blown. Still, concerns lingered. Fels Naptha is made for laundry and is used as a stain remover, Zest is made for skin care. Would my clothes be as clean? What the colors fade faster? Would it even turn out to be detergent?

To ease my concerns I examined the ingredients list and they are so similar. One of the pros to the DIY method is fewer chemicals than store bought detergents. The thought had crossed my mind that Zest would be riddled with additives and Fels Naptha would be more natural.Yeah, not so much. In fact both products seem to contain plenty of unpronounceable ingredients. The ingredients are listed below with everything that the two products have in common in red. There are more in common ingredients than not, and I was surprised to see that Fels Naptha has more ingredients than Zest. {Not that being 'natural' or 'organic' is a deal maker for me. My #1 priority here is savings}

Detergent using Fels Naptha

Fels Naptha Ingredients:
Sodium tallowate*, sodium cocoate* (or) sodium palmate kernelate*, and sodium palmate*, water, talc, cocnut acid*, palm acid*, tallow acid*, PEG-6 methyl ether, glycerin, sorbitol, sodium chloride, pentasodium pentetate and/or tetrasodium etidronate, titatium dioxide, fragrance, Acid Orange (CI 20170), Acid yellow 73 (ci43350)
Detergent using Zest Ocean Breeze


Zest Ocean Breeze Ingredients:
Sodium Tallowate and/or Sodium Palmate, Sodium Cocoate and/or Sodium Palm Kernelate, Water, Glycerin, Coconut Acid, Palm Acid, Palm Kernel Acid, Tallow Acid, Fragrance, Sodium Chloride, Titanium Dioxide, Pentasodium Pentetate, Tetrasodium Etidronate, Red 33, Green 3


On January 12th I took the dive and made a 5 gallon batch of detergent using Zest instead of Fels Naptha. Zest was slightly more challenging to grate- make sure your hands are completely dry at all times {slippery!} and the color of the detergent is blue, not surprising since the bar of Zest was also blue. After two weeks of use this gets two thumbs up from all members of the family! Joe is happy with his Ocean Breeze scented t-shirts, I'm satisfied with our savings, and Logan's skin is none the wiser!

Now here's a challenge for you! Leave a comment with a question about making laundry detergent. Did you have any thoughts or concerns that my posts didn't address?

Thanks for reading!

Bacon Ranch Chicken over Pasta


Happy Friday!

We enjoyed this recipe for the first time on Tuesday. It got a standing ovation at dinner! Even Logan (18 months old) cleared his plate!

I saw a variation of this recipe on Pinterest from justapinch.com. You can see their weight watchers version of this recipe here. I didn't have any light or low fat options in stock so I created this full flavor double sauce version {in our home we love sauce}.


My picture of Tuesday night's dinner shows Bacon Ranch Chicken over rigatoni. The weight watcher's version calls for whole wheat penne. You choose whatever pasta sounds best to you! I could see this being good with fettuccine and several other pastas as well.

Ingredients:
5 slices of bacon, crumbled
1 Tbsp butter
1/2 lb boneless, skinless chicken breast, cut into bite sized pieces
2 Tbsp all purpose flour
1 pkg ranch dressing mix ( 1/2 oz)
2 cups milk
1 cup shredded cheddar cheese
salt & pepper to taste

Preparation:
Fry bacon in a large skillet over medium heat until crisp. Drain all but 1/2 tablespoon of bacon drippings from the pan.
Season the chicken with season salt and pepper. Add the butter to the reserved bacon drippings, then add the chicken to the same skillet. Cook until tender, no longer pink, and juices run clear.
Sprinkle the flour and ranch dressing mix over the chicken, stirring to coat evenly. Stir in the milk, and cook, stirring occasionally, until thickened and bubbly. Stir in the cheddar cheese and half of the reserved bacon; cook and stir until the cheese is melted. Taste for seasoning and adjust as needed.
Serve over pasta with bacon sprinkled over the top. 

I hope you enjoy this one as much as we did!
Thanks for reading :)

Friday, January 18, 2013

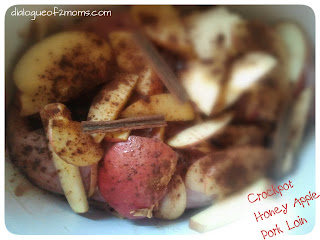
Crockpot Honey Apple Pork Loin


Friday! I had missed Friday. Here's your promised food post. Learn more about Food Friday here.

I have some very exciting news to announce! Yesterday was the big day. Finally! I have a new stove. This coming week I look forward to trying the Sloppy Joe Casserole everyone ranted and raved about last Friday.

This week's recipe {Honey Apple Pork Loin} is one of my favorites for the crockpot. It was especially a favorite during our (too long) stove-less period.

Enjoy!


Ingredients:

Pork Loin, 2.5-3 lbs.

Red Delicious Apples, 3 sliced

Honey, approx 4 T

Cinnamon, 2 T


Preparation:

Lay the apple slices (from two of the apples) in the bottom of the crockpot.

Sprinkle with cinnamon.

Cut slits in the pork loin (approx 1/2″-3/4″).

Drizzle some honey into the slits.

Then place apple slices into the slits.

Place the pork loin into the crockpot.

Drizzle the top with the remainder of the honey.

Place the rest of the apples on top.

Then sprinkle the whole thing with cinnamon.

Cook on low for 7 hours.


Let me know how you like and if you make any variations that I should try!

Thanks for reading :)

Friday, January 11, 2013

Sloppy Joe Casserole


This weeks Food Friday recipe is from the kitchen of our reader and friend Jillian. (Learn more about Food Friday here). She was sweet enough to share one of her family's favorites with me. Joe and I (especially Joe) are big sloppy joe fans and we're pretty anxious to give this a shot. Unfortunately we experienced a small set back in the form of spontaneous combustion inside our oven. I promise it was NOT my cooking that caused it! Point being that we can't try Jillian's recipe until we're able to bring home a new baking machine, but that day will be a glorious glorious day.


1 1/2 pounds ground beef
1 can (15 1/2 ounces) sloppy joe sauce
2 cups (8 ounces) shredded cheddar cheese
2 cups baking mix (Bisquick)
2 eggs, lightly beaten
1 cup milk
1 Tablespoon sesame seeds
Directions:
1. In a large skillet, cook beef over medium heat until no longer pink. Drain.
2. Stir sloppy joe sauce into beef. Mix well.
3. Transfer mixture to a lightly greased 13 x 9 baking dish. Sprinkle cheese over top.
4. Combine the biscuit mix, eggs and milk in a large bowl until just until blended.
5. Pour biscuit mixture over the cheese in casserole. Sprinkle sesame seeds on top.
6. Bake, uncovered, at 400° for 25 minutes or until golden brown. Makes 8 servings.

You can follow Jillian on Pinterest by clicking here!

We hope you enjoy the recipe, let us know what you think!
Thanks for reading :)


Tuesday, January 8, 2013

DIY Mason Jar Soap Dispenser


My 'unsightly' bottle of Dawn

This project is so simple, but still offers savings to enjoy, and a lovely touch of decor in your home. Let me set the scene: I'm home with a stomach virus. While laying on the couch for hours in total agony I've begun a challenging staring contest. My opponent is this ugly bottle of Dawn setting out on my sink. My house is tiny, I really can see this Dawn from my living room sofa with ease. It's bothering me... I might have cabin fever.

It's more efficient to set it out than to have to fetch it from a cabinet every time I need a squirt of Dawn's grease fighting power. But it's just not cute enough to match my new measuring spoon display, don't judge me! Ha ha ha.


A pump bottle could be so cute right? Right? Remember my post about saving all my jars? Check it out here. I have a collection of jars on top of my refrigerator, just waiting to be upcycled and put to good use. I also have a collection of bottled lotion with pump tops waiting to be slathered on my skin. Today I finally saw a bottle to it's end and commandeered the pump top.


I selected a left over mason jar to be my new soap dispenser. The assembly was incredibly simple. I started by stabbing the lid of the mason jar with a steak knife. I could have probably chosen a better utensil for creating this whole, but I get impatient and the steak knife was handy. Anyway, I started with cutting an "X" into the lid and then worked the whole bigger and bigger until the pump fit through the whole. I stopped several times to check and see if the pump fit yet. I wanted the pump to fit snugly. I roughly measured the length on the pump by holding it against the mason jar and snipped off the access with a pair of scissors. Next I secured the pump to the lid with hot glue.


Joe would have been totally aghast had he seen me doing all this. Using the wrong tools, doing 'rough' measurements, spray painting the grass... But if Joe had done this it would have taken several hours and we would have had the same final results. This adorable soap dispenser! I'm anxious to free up another pump top so that I can create a matching dispenser for hand soap. I'l have very soft and moisturized skin until I can get another lotion bottle empty.

You don't have to use a mason jar for this project. An easily disposed of empty jar of spaghetti sauce, olives, or pickles could be your next soap dispenser!


Do you have a DIY project you're itching to share? Let me know, I'd love to have you share your ideas here as a guest author!
Thank for reading :)


Sunday, January 6, 2013

Cabinet doors as organizing solution? Genius!


organizing measuring cups and spoons (6)
my inspration: found at
www.infarrantlycreative.net
More than a year ago, I pinned this photo. It caught my eye because my measuring spoons and cups are always a hassle. I've thought to myself a million times that there must be an easier, nicer looking way to keep them organized. Then bam! There it is. The source of the pin is http://www.infarrantlycreative.net and you can read their post about organizing measuring spoons here.
my own disshelved measuring
cups and spoons

Joe would never let me take a drill to a cabinet door unsupervised and it's taken me a year of showing him the photo and pleading, can we do this one this weekend? (It might sound sexist... but you didn't see what I did to the wall trying to hang a mirror.) Today was the day! He did most of this project while I watched. Joe did let me help a little, I got to hold the level. I'm pitiful, I know, but I learned a lot! Maybe before too many more projects have passed he'll trust me with the power tools again :)


The original pin, my inspiration, is shown using paint sticks. Good choice because hardware stores will give them to you for free. We had some paneling left over from a recent project in the bathroom, rather than make a trip to the hardware store for free paint stirring sticks we used up our scraps. Joe measured the cabinet door I selected and cut the long strip of panel into shorter pieces according to his meticulous measurements (Joe does everything meticulously).

I used some left over Rust-Oleum spray paint, which made the old white strips of scrap panel look like fake stone (That's right, I painted them not Joe. I did get lectured later for not properly cleaning the spray can's valve.) I think it looks nice, especially for having just thrown some left overs together.


Next, Joe measured and drilled nice, evenly spaced, level holes in our panels. After he drilled the holes I screwed in the hooks.

Joe vocalized a few tips and learning experiences for me as we got to the step where we attached the panels to the cabinet door. Number 1, make sure your screws are NOT longer than your cabinets are thick. Or else your screws will come busting out the other side of your cabinet door. That would not be pretty. (This might seem obvious to you, but I honestly wouldn't have thought about that. I know, I'm pitiful). Number 2, compare your screw to your drill bit and then mark the bit with tape. This is to be sure you don't drill all the way through your cabinet door. That would also not be pretty.
Joe's hand modeling
career is up and coming!

Meticulous Joe marked the cabinet doors and the panels to make sure we were hanging the panels level. This is where I came in and helped by holding the level! He assures me my role was very important. My husband wouldn't patronize me, would he?

Now, I went through my measuring spoons and cups and realized I was missing at least one spoon or cup from each set. So, naturally, I had to buy new ones. I mean, now my spoons are pretty much on display. I have to have one nice matching set. Or two :)


I hope you like the finished product as much as I do! 

We live in a VERY small house. I plan on taking on a lot of organizing projects before the new baby gets here in August. This one didn't clear out much space, but it was long over due. In the near future I have a whole room full of junk (from our current guest bedroom/office) to incorporate into other rooms of our house in order to make room for a second nursery. We're going to have to get creative, and I plan on sharing all of these creative solutions with you! If you have any unique organizing solutions for small spaces I'd love to hear from you!

As always, thanks for reading!


Friday, January 4, 2013

Creamy Italian Chicken


Happy Friday! As promised, here's you're Food Friday recipe. Learn more about Food Friday here.

Next Friday, I swear, there will be a NON-chicken recipe.

This one, though, is a family favorite, a friend favorite, a get together favorite. This one is good. It's also easy. Easy is important to me. This all makes it one of my favorites to cook.


The key is the creamy Italian sauce. After you make the sauce there's a lot of variations and twists for the rest of the recipe. I'm going to give it to you simple, and then at the end I'm going to give you some examples of how to mix it up and make it your own.

Sauce ingredients
Ingredients:
1 lb boneless chicken tenderloins; halved
1 cup frozen broccoli; chopped
1 cup frozen crinkle cut carrots
      (Veggies can be substituted with fresh)
1 26oz can of Cream of Chicken soup
      (That's the big family sized can.)
1 stick of cream cheese (softened)
1 packet of dry Italian Dressing Seasoning.

Directions:
Preheat oven to 450
In an oven safe casserole dish mix the softened cream cheese, the cream of chicken soup, and the Italian dressing seasoning together until it's a uniform color.
Stir in the chicken and vegetables
Cover with aluminum foil and bake for 45 minutes at 450 (until chicken juices run clear)
Serve over noodles


Variations! You can also make this in the crock pot: low for 6-8 hours; high for 4-6 hours. You can subtract the vegetable or change them, for example peas instead of broccoli. Maybe you prefer your veggies on the side instead of covered in sauce, that will work too. If we have left over chicken from some other recipe (I tend to cook for 4 instead of 2 1/2) I use the cooked chicken in this recipe and only bake it for 30 minutes. Use any king of noodles you want!

Put your own spin on this one and let me know how it goes :)
Thanks for reading!


Tuesday, January 1, 2013

Blogging Goals for 2013


It's here, the first day of 2013. A brand new year, with all new adventures waiting to be unraveled. Yesterday, the last ever day of 2012, I reflected on the lessons I learned so far as a blogger and now I'd like to share my goals for the coming year. If I put them out there I'm more likely to follow through with them, right?


You may have notice, but we own the domain name dialogueof2moms.com. Unfortunately it currently just forwards you to my old blogger carlysodyssey.blogspot.com. In 2013 I want to quit using blogger to host our blog (and finally be rid of that silly carlysodyssey) and be running 100% under dialogueof2moms.com. That transition is hopefully not as much work as I'm anticipating it to be.

In 2013, preferably early on, I'm going to learn more about these Link Parties that other more successful bloggers are raving about. Then I'm going to join in on a few of them. I heard about them first on The Thinking Closest, a blog which I've mentioned reasonably often lately. From what I understand these link parties are show and tell shin-digs for bloggers. I have big hopes that getting involved in link parties will inspire many new projects, teach me more about blogland, and maybe even increase our traffic. Maybe, just maybe, little ol' newbie me will be able to help out other bloggers too.

It may sound strange but this year I'm also going to make it a point to get involved in other blogs. If I want and need support from other bloggers I think I need to make the first step and give other people out there a helping hand.

Lastly I want to get some followers. I'm shamed by our pitiful 13 likes on Facebook, 3 followers on Pinterest (2 of which are Jamie and I), 21 followers on Twitter, 7 Blogger members, and exactly 0 followers by email. I'm not sure what's stopping our readers from following us but I'm determined to figure it out and make it right! Feel free to leave any tips as a comment, I promise to take any negative feedback like a champ. By the time 2014 is here I want to have quadrupled our current following. That means turning our current grand total of 44 followers into a whopping 176. That shouldn't be too hard, right?

Four humble goals. This is doable. Now I have to go get started!

Thanks for reading :)


How to transfer a photo to.. anything, for pretty much nothing


On December 5th, 2012 Joe and I discovered that we are expecting our second bundle of joy. I broke the news to him in a mostly lame way: picture message of the positive test while he was at work. I know, I know! Complete lack of creativity. Lets face it, I was exhausted, he was working late, and I knew he would want to know right away.

We've decided to let Logan break the news to our relatives at our various Christmas gatherings, I am pretty excited about our creative pregnancy announcement. Logan, being only 17 months old, doesn't have much of a vocabulary. How will he tell everyone the big news? He'll be sporting a custom red turtle neck that proclaims "I'm going to be a big brother! August of 2013" Joe and I aren't going to say a word. We're just going to wait until someone realizes what his shirt says and let the excitement spread.

Of course, you will be reading this after the fact. We don't want to ruin the surprise for anyone :)


There are plenty of places where you can get a shirt printed, but I like to do things as economically as I can. Here's how I customized Logan's shirt, the picture transfer method I use for my shirt template can be used for about nine-trillion projects.

What you'll need:
Freezer paper 
Copy paper (or construction paper)
Spray adhesive (or other adhesive)
Ink jet printer
Scissors

Step 1: Cut a piece of freezer paper to measure 8.5 x 11, exactly the same size as your usual copier paper.


 Step 2: Use an adhesive to attach the copier paper and freezer paper back to back. Make sure the waxy side of the freezer paper is facing out. I really only used colored construction paper so that you could see what I was doing better in the picture here. ** If you don't have spray adhesive handy I'm sure mod podge or a glue stick would do the trick.


 Step 3: Print your picture onto the waxy surface of the freezer paper. You may want to run a test page first to make sure you're putting your freezer paper through the printer right side up. Also, especially if your transferring text, make sure your printing a mirror image. You can see in my Word doc below that I did a vertical flip with the WordArt.


Also notice how the ink is pooled on the waxy surface of the paper. The wax coating prevents the ink from being absorbed into the paper and allows the transfer. This also makes is extremely easy to smudge! Be careful not to smear the ink. Because of the way the ink pools on top of the wax I'm not sure this would be a good method for transferring complex detailed pictures. 

Step 4: Before the ink dries, press the picture against the surface you want to transfer it to. Press and rub in a circular motion for a minute or two making sure to have pressed the entire span of the picture against the item you're transferring it to. Be very careful that the paper doesn't move while you're doing this or else your picture will smear.


Step 5: Remove the transfer paper and marvel at your good work 

This is a pretty much horrible picture. Sorry bout that.

The ink doesn't stand out much on this well worn in cotton fabric. It would also fade so fast it would be gone in two washes. So in this project I was just transferring the picture as a template for my fabric paint.


I think the finished project shouts the good news loud and clear :)


Wipe off your transfer paper to re-use it for future projects!


Always Kiss Me Goodnight - romantic wall words vinyl home decor lettering graphic calligraphy old barn rescue company

Maybe you want to transfer text to a wall to create a look similar to this vinyl wall art that you can purchase on Etsy.

Or you could transfer a picture/text to canvas or painted wood to create your own wall art.

I feel like the possibilities are endless!


I hope you found this helpful! If you you have tips, tricks, or if your going to use this transfer paper in a project of you own please let us know!

And thanks for reading :)

Monday, December 31, 2012

My Blogging Lessons of 2012

Today, this fateful last day of 2012, I would like to reflect on the lessons I've learned this year as a new blogger.

My first post, about mine and Logan's moon sand adventure, was published on November 11th. This means, could it be? I've only been blogging for 7 weeks! In the past 7 weeks (still can't believe it's only been 7 weeks!) I've learned a lot about the blog-o-sphere. 

Making Moon Sand
I think the most important thing for a blogger to learn is also the most obvious and probably doesn't need to be mentioned. I'm going to go ahead and throw it out there anyway: publish useful and original content. It's probably best that you learn this lesson before you even click that "Get Started" button and register for your first free blog account.

Find a photo editor and edit those photos. The most useful tip I've learned thus far is to edit my pictures with pixlr. I don't understand how pixlr escaped me, how did I not know about this amazing and FREE photo editor? I have to give credit where credit is due. I discovered pixlr while reading "10 Tips for New Bloggers... From a New Blogger" which I found on Lauren's blog "The Thinking Closet". Lauren saved me a nice chunk of cash. Before I found pixlr I was actually considering purchasing a photo editor just for the few features I need to touch up photos for blog entries. I've since then learned to use pixlr's advanced and efficient options. I've been able to create our custom headers, our social media buttons, and our background on top of editing photos for articles. Did I mention it's free?

"DIY Household Cleaners"
One of those articles I just couldn't
wait to publish... that no one read
 Design your site to be simple to navigate, easy to look at, and reflect your content BEFORE you publish your first post. This is the lesson I learned too late. My head was full of article ideas for money saving tips and so many other useful tid-bits and I was so anxious to get the knowledge out there that I put web design on the back burner. That was such a big mistake! The dynamic template I was using through Blogger was hard to understand and navigate, it gave my content a poor presentation, and it was overwhelmingly generic. No one bothered to tinker with it long enough to read any of my articles. Finally I caught the hint, and spent some time educating myself on the options I have through Blogger to customize our look (It helped that Jamie told me "I hate the way this looks" and I agreed.). I found a layout that was simple and began to customize widgets and write/edit code to come up with a look that suites "Living With Joe; the dialogue of two moms". Don't make this mistake, design your website first! Get inspiration from other blogs. I really enjoy the look of "Sweet T Makes Three" and "One Good Thing by Jillee" and even googled how to make some of their design concepts a reality for our Blogger sponsored site. Even though our look has come a long way I don't think we're done yet. If you want any help with your own blog please don't hesitate to ask! I love to help. No doubt, coming soon will be a post containing all the websites I visited for tips and tricks on customizing our blog.


"Unorthodox Diapering"
Another of my early posts
with low traffic
Connect with your readers. On December 11th I took a leap of faith and made a twitter account, a facebook page, and a pinterest account for "Living With Joe; the dialogue of two moms". And then made the addition of coordinating "Follow us on..." buttons to our side menu. Why was this a leap of faith? Because if no one follows us there's blatant evidence right there on our pages. The sad messages "0 people like this on facebook", "2 followers on Pinterest", ect. There's also the ridicule from the unsupporters in my day to day life, "You made a facebook page for your blog?". But the truth is, I didn't start publishing these articles for my own good, they're not for me to read. They're for you, so I need to have a way to get them to you. Not to mention a way for you to share the articles with other people who might be helped by the information. I also created the email address info@dialogueof2moms.com, giving our readers a way to communicate with us without having to leave a comment for the world to read.

Give your blog some predictability. Being the mom to an 18 month old little boy, the wife of a hard working man, the keeper of a home, the head of a customer service department (actually, the only person in the customer service department...), and an independent sales consultant leaves little, I mean no time for a structured blog posting schedule. Which also means no predictability for our readers. I've been trying to change that with our "Food Friday" posts. Maybe our other posts about beauty, life lessons, and DIY projects are at random intervals, but you can count on at least one new recipe every Friday. 

I hope that sharing my lessons learned helps you get a head of the learning curve! If you have a tip of your own don't be bashful, share it with us :) And as always, thanks for reading!

Custom Christmas Coffee Cups

"Grandpa Cy- a man that worked so hard at being Dad,
he got promoted to Grandpa." 
Here's another of our homemade Christmas presents from 2012. Custom Christmas Coffee Cups. (You should pin this for next year. Just saying, he he) This one had a decently large amount of instant sentimental value to everyone that received one. We even saw a few happy tears from a recipient, which was one of  best feelings that I experienced this Christmas.

Joe and I decorated one side of each cup and Logan decorated the other side. Logan's side is covered in scribbles, none the less, I know his craftsmanship is what gives this gift it's value.

Making these mugs is so simple, but it was not quite what we expected.

To decorate a coffee mug, or any piece of ceramic glassware, just use Sharpie markers and then bake  it for 30 minutes at 350. It sounds really easy, right? Like the only challenge is deciding what to put on your dish of choice, right? We did learn a few lessons along the way...
Noni \nah-nee\ (n):
A woman with a garden of love
growing in her heart

1. Yellow turns our brown and looks disgusting.
2. Red, orange, and green will wear off the most quickly.
3. Pretty much, that means only use black or blue.
5. They are NOT dish washer proof, not even abrasive-side-of-the-sponge proof.
5. Basically, they're only good for sitting on a shelf and looking pretty.

It seems to me that the ink probably would have stuck around just as long if we hadn't bothered to bake the mugs. I'm not certain, but the projects many failures may have been because our ancient oven varies  in temperature rather than maintaining the 350 that I requested from it.

I explained to everyone, after they opened their cups, that they had to choose whether the functionality of the cup or the decorative scribblings of an 18 month old were more important to them (because, if you didn't catch on, the words are going to wash off after a few uses). Everyone still enjoyed the thoughtfulness and the sentimental value of their new decorative mugs. Not to mention we had a lot of fun making them, especially Logan :)


Sunday, December 30, 2012

Adult Hot Chocolate


Now that Christmas is behind us I can finally share all my DIY Christmas present projects from this year! Go ahead, pin this for next year :)

For our co-workers Joe and I put together these Adult Hot Chocolate kits. The Christmas season is very busy and stressful for us at work, so we came bearing the gift of holiday stress relief. In each mason jar is a serving of Swiss Miss powdered hot chocolate mix, a handful of marshmallows, and small bottle of a complimenting liquor.


I got the miniature bottles of liquor at the local liquor store, Noonan's. We bought an assortment of mint chocolate, mocha, and caramel liquors. The quilted mason jars were at Kroger's and, conveniently, they came with those cute labels that I filled in with 'Merry Christmas!' I attached the little bottles of liquor with a simple piece of red yarn. The final touch, my homemade label:

Cute, right?


Stay tuned to hear about our salt dough ornaments, and hand decorated Christmas coffee mugs!

I also made custom decorated candles using the same method I used to make the memorial candles I already posted about. You can read about them here. I ended up making 9 more sets of memorial candles for other family, and 6 more candles as Christmas presents.